Sunday, June 07, 2009

Pissenlits

The weather wasn't great this weekend. Non-stop rain and 12 degrees yesterday. Today was dry, but still cold. So, a good weekend for watercolours. I've already finished my "Pissenlits" painting.

I should have gone for stronger value contrast by darkening the background more (more like it is to the right), but it's not bad all the same.

I masked all the white bits first, but found that when I removed the masking fluid, the white wasn't strong enough - there was too much background showing, so I had to go back over with white acrylics (which I applied with a fine brush, having mixed it first with pouring medium to make it easier to apply).

I'm quite happy with my wood. It is not really purple, but the colour matches the photo quite well and it is such an attractive colour.


Here is a redder version of it (colour variation courtesy of Photoshop Elements) which I think works better:



Friday, June 05, 2009

Pissenlit

That's the French word for Dandelion, and, yes, it means "piss in bed".

And I'm not sure if the fluff that blew onto our decking a couple of weeks back was dandelion or not, but it was so pretty that I had to take a dozen pictures of it. And now, it's my next project. I think it's going to be a watercolour, with lots of masking fluid, and I think it's going to have to be larger than my usual, or the masking fluid marks will look too clunky.

In the meantime, here is my first drawing of it. I love my Helix auto eraser. I got it a few years ago, and I should use it more. It makes drawing more like magic!

Collage

I have a collage project in progress, using scanned photographs, acrylics and kitchen paper. I'm not 100% sure where to take it from here - I think it will need a deep frame, without glass, and I'd like to add a few objects to it - a thimble, and some dried camomille flowers.

Here you can see the various papers I've used. Using kitchen roll paper was great fun - paint it with acrylics, then press it down on acrylic paper to apply the pattern. I'm not sure how it will do over time. Hopefully it won't warp or sag.
Here I played around with the various shapes, deciding how to arrange the overall composition.

Maybe I should glue it to a harder background (it's just glued and painted on acrylic canvas-textured paper)? Or I can ask the framer if they can put a rigid backing onto it.

Here is where I am now (the French flag effect was unintentional, by the way!):

Thursday, June 04, 2009

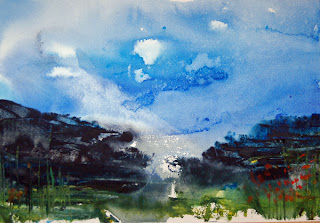
Red flowers over cliffs

This is a mixed media project - watercolours and acrylics. 


It started as an experimental watercolour, following guidance from Nita Engle's How to Make a Watercolor Paint Itself. An experiment gone wrong, I have to admit, as I didn't use the right kind of paper (I used heavy, highly-absorbent, watercolour paper, where the author recommended illustration board, which lets the paint and water flow more freely) and the right kind of tools (I used recycled hair colour bottles instead of the recommended "oiler boilers" from Cheap Joes)

But there was something nice about the freedom of it all the same, so I decided to build on it - first by creating a shaft of light hitting the water (with a simple eraser - that's in the picture above already), then creating a horizon on the sea (with a ruler and the same eraser), drawing flowers from pictures I found on Flickr, removing the watercolour from those areas, and finally painting these exotic flowers with acrylics (there was too much pigment left in the paper to paint over with watercolours).

For those of you with a sharp eye or a mystical bend, there is what looks like a white candle in the lower center of the picture. That's a pure accident, or the hand of God, whatever you want to call it. Anyway, it's been erased from the final painting!

Step 4

Sorry, no picture today. I forgot to take my camera to class last night. 

We covered quite a lot - Moya helped me fix the banana, softening the sharp line, and Des helped me with the satsuma - he gave the satsuma peel a nice rounded feel, which I tried to reproduce on the smaller part of peel, but not quite as successfully. What I found the hardest was mixing the right colour for the shadow part of the peel and I felt that my brush was too big for the detailed work.

Next week - we'll put highlights on everything, then we'll finish the shadows and background, and we'll be all done!

After that, I think I'll try to do another still life at home, without any help from my 2 teachers!

Wednesday, June 03, 2009

Bloom

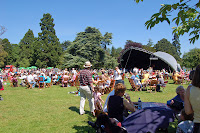
We went to Bloom on Monday (it was a bank holiday). The weather was perfect all through the weekend for a garden show, and there were big crowds throughout the day. We arrived early enough, at 10:30, but it was already busy then. 

It was all well organised - we did
n't encounter any traffic issues (though we didn't like having to pay €5 for parking in a field), there were all sorts of things to look at - cookery demonstrations, food market, hanging baskets, garden furniture and accessories, a walled Victorian garden, a "White House" vegetable garden, a concert area, and plenty of activities for children. I enjoyed looking at all the display gardens, and I got some useful advice on how to keep my basil alive (put it in the window, and water only when the pot feels light, more or less every 3 days - I had been watering it every day and was wondering why it was dying!)

We're looking for a garden table and chairs, and anything we had seen so far in the usual shops was too big, too rickety or too expensive (and in some cases, all three together). So we were hoping that some of the exhibitors would be garden furniture companies, and we did find one company, based in Carlow, that seemed to have what we were looking for. The products look well finished (they are Swedish), and the prices were keener than what we'd seen previously. We'll have to take a trip down to Carlow to investigate further, as they had limited display items at the show.

And we found a new poppy colour - such a delicate pink - I'll have to paint this some time!

Bamboo

We got 3 bamboos and large pots a few weeks ago, to give a bit more privacy on the decking to the side of the house.

We nearly lost one of them, as we hadn't watered them, thinking that the rain we got through May would have been enough to keep them going. Once we realised that they needed a lot more water than we had thought, I've been watering them every evening - one full watering can for the 1st one, which gets a lot of sun, and half a can each for the other 2.

They seem to like their new regime, and they are sprouting lots of new shoots - one of the pots now has 8 new stalks growing out of the ground at an amazing pace - the warm weather of the last few days certainly helped them along the way.

Monday, June 01, 2009

Banana


I'm trying to get as much as possible out of my art classes, and there is no better way than to put what I've learned into practise as soon as possible. Just like when I'm giving training, I tell my customers that they should go through what I've taught them within the next few days, or they'll forget it.

So, I decided to draw a banana, using shading to highlight its planes. I could have added a few other fruit, but it was the banana we had focused on last Wednesday, so I thought it best to stick to it. At first, I thought I would never get the shape right, but I went back over it until I was happy that it looked like a real banana - maybe not exactly the banana I was looking at, but close enough.